


Enjoy this decadent No Bake Chocolate Berry Tart. A rich, creamy, and refreshing dessert that's both gluten-free and vegan, perfect for any occasion.
Oh my gosh, you guys, remember that summer I was obsessed with finding the perfect dessert that wouldn't make me feel guilty but still tasted like pure heaven? My kitchen was a disaster zone of failed experiments, honestly. Then, one sweltering afternoon, staring at a pile of berries and a lonely avocado, it hit me! What if I combined all my favorite things into one glorious, no-fuss treat? That's how this incredible No Bake Chocolate Berry Tart was born. It was a revelation, honestly.
My first attempt at this tart? Let's just say I got a little too excited with the food processor for the crust. I ended up with what looked like a chocolate-almond smoothie, not a crust! Oops. It still tasted good, but pressing it into the tart pan was… a challenge. I didn't expect that. Lesson learned: pulse, don't pulverize, my friends!
Ingredients for Your Dreamy No Bake Chocolate Berry Tart
- 1 cup raw almonds: Oh, these are the unsung heroes of our crust! I love how they bring that perfect nutty crunch without being too overwhelming. They're the foundation, the sturdy base that holds all that chocolatey goodness. Plus, raw almonds are so versatile, I always have a bag on hand for snacking or, you know, making epic tart crusts. Just make sure they're fresh for the best flavor!
- 1/2 cup pitted Medjool dates: Medjool dates are like nature's caramel, seriously! They're what binds our crust together, giving it that lovely chewiness and a touch of natural sweetness. No refined sugars needed here, which is a huge win in my book. Make sure they're soft and squishy if they're a bit dry, a quick soak in warm water for 5 minutes works wonders. Don't skip pitting them, unless you want a crunchy surprise!
- 1/4 cup unsweetened cocoa powder: This is where the chocolate magic begins for the crust! Using unsweetened cocoa powder means we control the sweetness, and it gives that deep, rich chocolate flavor without being cloying. I remember trying a sweetened version once, and it was just too much. This ensures our No Bake Chocolate Berry Tart has that perfect balance of bittersweet goodness right from the base.
- 1 large ripe avocado (about 1 cup mashed): Okay, I know, avocado in a dessert sounds wild, right? But trust me on this one! It's the secret weapon for that incredibly creamy, silky smooth filling. You won't taste avocado, I promise! It just provides the healthy fats and texture we need. Make sure it's super ripe, almost squishy to the touch, for the best, most decadent results.
- 1/2 cup maple syrup: Maple syrup is my go-to sweetener for almost everything, and it shines in this tart. It brings a lovely, nuanced sweetness that complements the chocolate and berries so beautifully. Plus, it's vegan! I've tried agave, but maple just has this depth of flavor that really makes the filling sing. Don't skimp on quality here, a good maple syrup makes all the difference.
- 1/4 cup full-fat canned coconut milk (thick cream part only): This is crucial for achieving that luxurious, velvety texture in our chocolate filling. You want to refrigerate the can overnight so the thick cream separates and rises to the top. Just scoop out that glorious, solid cream. The watery part? Save it for a smoothie! This coconut cream makes the filling so rich and decadent, giving our No Bake Chocolate Berry Tart a super gourmet feel.
Crafting the Perfect No Bake Chocolate Berry Tart: Your Step-by-Step Guide
- Step 1: Make Tart Crust:
- First things first, let's get that crust going! Toss your almonds, dates, cocoa, and sea salt into a food processor. Pulse, pulse, pulse until it looks like coarse crumbs and sticks together when you pinch it. Then, drizzle in that melted coconut oil and give it a few more pulses until it's a sticky, crumbly dough. This is the foundation for our amazing No Bake Chocolate Berry Tart, so make sure it's well combined but not over-processed we want texture!
- Step 2: Press Crust:
- Now for the slightly therapeutic part! Press that glorious crust mixture evenly into your tart pan. I like to use the bottom of a flat glass or my knuckles to really get it packed in there, especially up the sides. Aim for a nice, even thickness. Pop it into the freezer while you work on the filling. That chill time helps it firm up beautifully, ensuring a perfect base for our No Bake Chocolate Berry Tart.
- Step 3: Prepare Filling:
- Time for the magic filling! Scoop your mashed avocado into a high-speed blender or food processor. Add the remaining cocoa powder, maple syrup, that thick coconut cream, and vanilla extract. Blend, blend, blend until it's unbelievably smooth and creamy. Seriously, keep scraping down the sides until there are zero lumps. It should be glossy and look like the most decadent chocolate mousse you've ever seen. This is the heart of our No Bake Chocolate Berry Tart, so make it perfect!
- Step 4: Add Melted Chocolate:
- Okay, this step is optional but highly recommended for that extra richness! Melt some dark chocolate (dairy-free, of course!) and gently fold it into your avocado mixture. It just takes the flavor to another level, adding a depth that's just divine. Make sure it's cooled a little so it doesn't cook the avocado. This little trick gives an even more luxurious, intense chocolate punch.
- Step 5: Assemble and Chill:
- Pour that luscious chocolate filling into your chilled crust. Use an offset spatula or the back of a spoon to smooth out the top until it's perfectly even. Give the tart pan a gentle tap on the counter to release any air bubbles. Now, the hardest part: chilling! Pop your gorgeous tart into the fridge for at least 4 hours, or even better, overnight. This is essential for the No Bake Chocolate Berry Tart to set up beautifully.
- Step 6: Prepare Berry Topping:
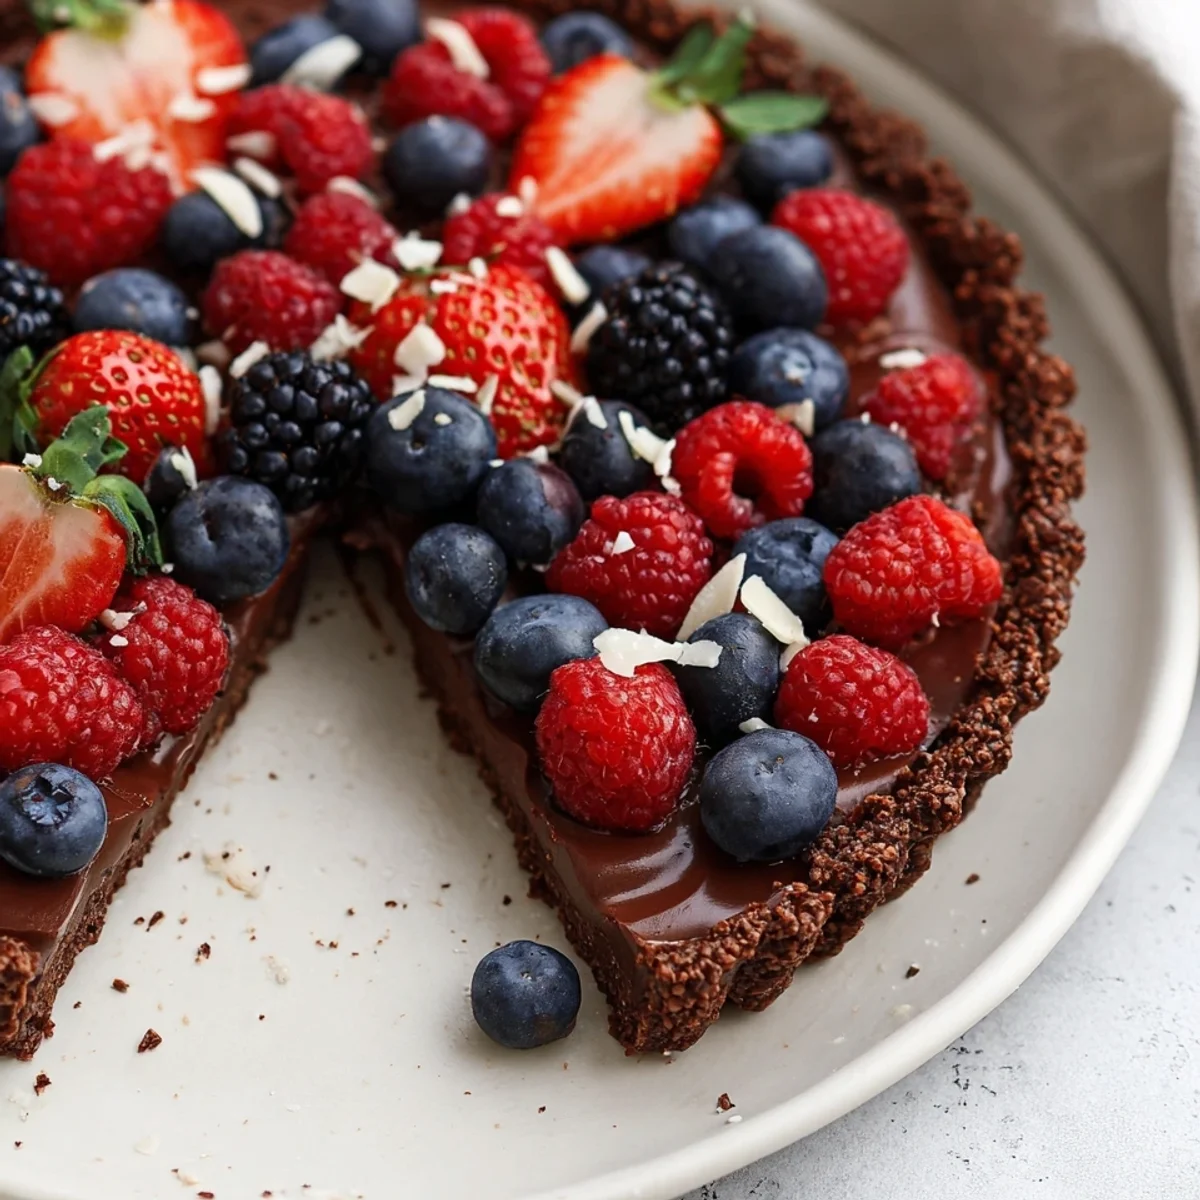
- While your tart is chilling, get your berries ready! I love a mix of fresh raspberries, blueberries, and sliced strawberries. Give them a gentle wash and pat them dry. You can leave them as is, or for an extra shine, toss them with a tiny bit of maple syrup or lemon juice. Arrange them artfully on top of your set tart just before serving. They're the crown jewels of this incredible dessert!
Making this tart always brings a smile to my face. There's something so satisfying about transforming simple ingredients into something so decadent, without even turning on the oven! Every time I make it, it feels like a little act of self-care, a sweet reward for a day well-spent. Plus, the smell of cocoa and fresh berries? Heavenly.
Keeping Your No Bake Chocolate Berry Tart Fresh: Storage Secrets
Okay, so you've got leftovers of your gorgeous No Bake Chocolate Berry Tart (if that's even a thing, haha!). The best way to store it is in an airtight container in the fridge. It'll stay fresh and delicious for up to 3-4 days. I've made the mistake of leaving it uncovered once, and the crust got a little dry, and the berries, well, they weren't as vibrant. You can also freeze individual slices, wrapped tightly, for up to a month! Just thaw them in the fridge for a few hours before serving. Perfect for a spontaneous sweet craving, right?

Playing with Flavors: Substitutions for Your No Bake Chocolate Berry Tart
I've played around with so many variations of this No Bake Chocolate Berry Tart, it's wild! If almonds aren't your jam for the crust, pecans or walnuts work beautifully too just keep the quantities the same. For the filling, if you're not into maple syrup, agave nectar is a good swap, though it has a slightly different flavor profile. I've even tried a mix of half avocado, half silken tofu for the filling when I was running low on avocados, and it was surprisingly creamy! And berries? Go wild! Sliced peaches or cherries are amazing when in season. Don't be afraid to experiment, that's half the fun!
Serving Up Your No Bake Chocolate Berry Tart: Ideas & Pairings
Serving this No Bake Chocolate Berry Tart is where you get to show off a little! I love dusting it with a tiny bit of extra cocoa powder or even some shaved dark chocolate for that gourmet touch. A sprig of fresh mint or a few edible flowers can really elevate its look, making it feel extra special. For a little something extra, a dollop of dairy-free whipped cream or a scoop of coconut vanilla bean ice cream on the side? Oh my goodness, yes! It's also fantastic with a strong cup of coffee or a chilled glass of sparkling kombucha. Perfect for a potluck or just a cozy night in.
The Sweet Story Behind the No Bake Chocolate Berry Tart
While this No Bake Chocolate Berry Tart is my own little creation, its roots feel very American to me combining convenience with wholesome ingredients, and a nod to classic chocolate desserts. No-bake desserts themselves gained popularity during wartime and in kitchens without ovens, evolving into things like icebox cakes and pies. My version is a modern twist, leaning into the vegan and gluten-free movement that's become such a huge part of contemporary American food culture. It's about making delicious treats accessible to everyone, without compromising on flavor or that comforting, homemade feel. It’s my way of blending tradition with modern sensibilities, honestly.
This No Bake Chocolate Berry Tart isn't just a dessert, it's a hug in food form. It's proof that healthy can be incredibly delicious, and fancy doesn't have to mean complicated. I hope you love making and sharing it as much as I do! If you whip up this beauty, please share your creations with me. I'd love to see your berry masterpieces!

FAQs About Making Your No Bake Chocolate Berry Tart
- Can I make this No Bake Chocolate Berry Tart ahead of time?
Yes, for sure! This tart is actually even better when made a day in advance. It gives all those amazing flavors a chance to meld together and ensures the filling is perfectly set. Just keep it covered in the fridge, and it'll be ready to wow your guests whenever you are. Super convenient!
- My crust isn't sticking together, what went wrong?
Oops, that can happen! Usually, it means your dates weren't soft enough or you need a tiny bit more moisture. Try adding another Medjool date or a teaspoon of melted coconut oil, then pulse again. You want it to feel sticky when you pinch it between your fingers, like wet sand. Keep trying, you'll get it!
- I don't like avocado, will I taste it in the filling?
Honestly, no! That's the magic of using ripe avocado here. Its mild flavor is completely masked by the cocoa powder and maple syrup. It's there purely for its incredible creamy texture, making the filling smooth and decadent without any weird avocado taste. It's a secret ingredient that fools everyone!
- What if I don't have a tart pan with a removable bottom?
No worries! You can use a regular pie dish or even a springform pan. If using a regular pie dish, I recommend lining it with parchment paper, leaving an overhang on the sides. This creates 'handles' to lift the tart out easily for serving. Just be gentle when transferring your gorgeous No Bake Chocolate Berry Tart!
- Can I use frozen berries for the topping?
You can, but I'd recommend sticking to fresh berries for the topping if possible. Frozen berries tend to release a lot of water as they thaw, which can make your beautiful tart topping a bit watery and mushy. If you must use frozen, thaw them first, drain really well, and pat them dry before arranging.
No Bake Chocolate Berry Tart: Gluten-Free & Vegan
Enjoy this decadent No Bake Chocolate Berry Tart. A rich, creamy, and refreshing dessert that's both gluten-free and vegan, perfect for any occasion.
Ingredients
Chocolate Almond Crust
- 1 cup raw almonds
- 1/2 cup pitted Medjool dates
- 1/4 cup unsweetened cocoa powder
- 1/4 tsp sea salt
- 2 tbsp melted coconut oil
Creamy Avocado Chocolate Filling
- 1 large ripe avocado (about 1 cup mashed)
- 1/2 cup unsweetened cocoa powder
- 1/2 cup maple syrup
- 1/4 cup full-fat canned coconut milk (thick cream part only)
- 1 tsp vanilla extract
- 1/4 tsp sea salt
- 1/2 cup soy-free vegan dark chocolate chips, melted
Fresh Berry Topping
- 2 cups mixed fresh berries (such as raspberries, blueberries, and sliced strawberries)
- 1 tbsp fresh lemon juice
Garnish & Finishing Touches
- 1 tbsp cacao nibs, for garnish
- Fresh mint leaves, for garnish
Instructions
-
1Make Tart CrustCombine 1 cup raw almonds, 1/2 cup pitted Medjool dates, 1/4 cup unsweetened cocoa powder, 1/4 tsp sea salt, and 2 tbsp melted coconut oil in a food processor. Process until the mixture forms a sticky, cohesive dough.
-
2Press CrustPress the crust mixture evenly into the bottom and up the sides of a 9-inch tart pan with a removable bottom. Ensure it's compact and firm. Place the crust in the freezer while preparing the filling for your No Bake Chocolate Berry Tart (Gluten-Free & Vegan).
-
3Prepare FillingIn a high-speed blender, combine 1 large ripe avocado (about 1 cup mashed), 1/2 cup unsweetened cocoa powder, 1/2 cup maple syrup, 1/4 cup full-fat canned coconut milk (thick cream part only), 1 tsp vanilla extract, and 1/4 tsp sea salt. Blend until completely smooth and creamy, scraping down sides as needed.
-
4Add Melted ChocolateMelt 1/2 cup soy-free vegan dark chocolate chips using a double boiler or microwave. Add the melted chocolate to the blender with the avocado mixture. Blend again until fully incorporated and the filling is rich, glossy, and perfectly smooth. This creates the decadent center of your No Bake Chocolate Berry Tart (Gluten-Free & Vegan).
-
5Assemble and ChillPour the chocolate filling into the prepared crust. Spread evenly with a spatula to create a smooth top. Refrigerate the tart for at least 4 hours, or preferably overnight, until the filling is firm and set. This is crucial for the structure of your No Bake Chocolate Berry Tart (Gluten-Free & Vegan).
-
6Prepare Berry ToppingIn a small bowl, gently toss 2 cups mixed fresh berries (such as raspberries, blueberries, and sliced strawberries) with 1 tbsp fresh lemon juice. The lemon juice brightens the berries and adds a lovely tang.
-
7Garnish and ServeOnce the tart is firm, carefully remove it from the pan. Arrange the fresh berry topping artfully over the chocolate filling. Garnish with 1 tbsp cacao nibs and fresh mint leaves before slicing and serving.
Notes
For the thick coconut cream, refrigerate a can of full-fat coconut milk overnight. The cream will separate and solidify at the top, making it easy to scoop out.
Store leftover tart in an airtight container in the refrigerator for up to 3-4 days. The crust may soften slightly over time.
Feel free to customize the berry topping with other seasonal fruits like sliced kiwi, cherries, or even a sprinkle of toasted coconut flakes.
For the cleanest slices, use a sharp knife dipped in hot water and wiped clean between each cut.
Equipment
Please check ingredients for potential allergens and consult a health professional if in doubt.
Nutrition Facts
It is important to consider this information as approximate and not to use it as definitive health advice.
Comments
Leave a Comment